
Building a website for the first time can feel overwhelming. Hosting, domains, WordPress, themes, plugins; it seems like a lot to figure out.
The good news? You don’t need coding knowledge or professional design skills. Today’s tools allow beginners to create professional websites quickly, even in less than an hour, if you follow a clear step-by-step approach.
This guide assumes no prior or limited knowledge and walks you through everything you need to get online.
Step 1 – Choose Your Website Platform
A website platform (CMS) is the tool that powers your site. It lets you create pages, posts, upload images, and control layout. Choosing the right platform first saves time and avoids headaches later.
Recommended Option: WordPress.org
- Why WordPress: Free, flexible, widely supported, compatible with most hosting providers, and scalable for future growth.
- Beginners Tip: Use the block editor (Gutenberg) to create pages visually — no coding required.
- Product Context: WordPress integrates with AI tools like ChatGPT plugins, Jasper AI, and AI image generators (e.g., DALL·E) for content creation.
- Good to know: Many beginners start with WordPress, which you can try for free on your hosting account. Even though WP is free and user-friendly, it is not an amateur tool. As shown in the chart below, most international businesses and large brands like Sony Music, Mercedes Benz, Microsoft, Walt Disney and many others rely on WP for their online operations.

Alternatives: Website Builders
- Wix, Site123, Squarespace, Weebly
- Use these if you want:
- A fully hosted solution with drag-and-drop interface
- Minimal setup and almost no technical configuration
- Limitations: Less flexibility for SEO, eCommerce, or long-term growth
You can explore Site123 or Wix to see if their builder matches your needs.
Step 2 – Choose and Register Your Domain (Your Website Name)
Your domain is your website address (e.g., example.com). It’s one of the first things visitors will see, so choose wisely.
How to Choose a Domain
- Easy to remember and spell
- Short if possible
- Avoid numbers or special characters
Domain Extensions
- Recommended: .com, .org. These are by far the most common and used extensions by most websites.
- Optional: .studio, .online, .shop. These extensions are less familiar to users but you can pick one of them if you prefer.
Where and How to Buy a Web Domain?
- Namecheap – budget-friendly, fast support. Many users register domains with Namecheap, which offers competitive pricing and reliable service.
- GoDaddy – global brand, multilingual support

There are several sites where you can register your domain.
I always use Namecheap because I find its prices usually more competitive. However, NameCheap is only in English. If you prefer to use a site supporting other languages, a good alternative is GoDaddy.
Below is an explanation of how to search for a domain available on Namecheap. From the top menu on Namecheap homepage click on the top menu Domains > Domain Name Search. All you do is type in the name of the domain you have chosen followed by the extension you prefer (.com, .org, etc.) in the search bar.

In this case, I did a search for templatetester.com and, of course, the search says that it is no longer available.

If the option you prefer isn’t available, repeat the search with other names until you find a domain that is still available.
As you can see, the cost of a domain is very reasonable. Prices range from just a couple dollars and up. There are some premium domains that can cost up to a few thousand Dollars, but in most cases the prices are very low.
How to Build a Website – Buy an SSL Certificate
You cannot effectively learn how to build a website without learning about SSL certificates. Buying an SSL certificate for your domain is optional, but not buying it means you’re off to a bad start with your site.
The SSL (Security Sockets Layer) certificate is a protocol that protects communications on the internet. It protects sensitive user data such as credit card numbers, passwords, etc. Although the SSL certificate is very important especially for eCommerce sites, all sites should have one.

When a domain is protected by an SSL certificate, the address changes from http:// to https://. The additional “s” indicates the presence of the certificate.
If the certificate is not present, Google will consider your site dangerous and will tend to penalize it in search results. In addition, several browsers, such as Chrome, will tell users that the site is unsafe and many of them will choose not to use your site.
So, even though purchasing an SSL certificate is optional, not having it would be a huge mistake. That’s why I recommend that you buy an SSL certificate which is usually provided at a very low price from the same site where you buy your domain.
If your budget is really limited and you want to save as much as possible, you can create a free SSL certificate on Let’s Encrypt.
Keep in mind, however, that installing this free certificate on your site is anything but easy. You can try to venture into doing it on your own, but it’s likely that you’ll have to pay someone to do so. For this reason, take time to determine whether the free solution will really save you money.
Step 3 – Choose a Web Hosting Service
So far, you have chosen the platform on which to build your site, you have the domain and the SSL certificate that protects it. The next step is to choose a web hosting provider.
Web hosting is the web space where your site is hosted. It is the place where all the content, images and files of your site are stored and made accessible to the public. Without web hosting, your site cannot exist.
There are hundreds of web hosting services to choose from, but not all offer the same performance.
Hosting Provider | Why It Works for Beginners | Comments |
Performance-focused, beginner-friendly support | A2 Hosting is often recommended for fast and reliable shared hosting | |
One-click WordPress install, guided onboarding, free SSL | Many beginners use Bluehost to quickly set up WordPress | |
Budget-friendly, easy WordPress integration | Namecheap Hosting works well for first-time website owners | |
Managed hosting, automatic updates, excellent support | WP Engine is a good option for those seeking managed WordPress hosting with less setup. |
Features of a Good Web Hosting Provider
There are three things to which I pay close attention to when I have to choose the best hosting provider to run my sites.
- Speed. The hosting service must ensure that pages on your site are loaded quickly. You will soon learn that a slow site is unlikely to succeed.
- Reliability and Uptime. Choose a hosting service that guarantees you an uptime as close as possible to 100%. This value ensures that your site is always reachable by users and almost never goes offline. Some hosting services are not very reliable and have an uptime even below 80%. This is especially important when you are expecting your traffic to be substantial. If your users cannot enter the site, your business will suffer greatly.
- Customer Support. There will be times when you will have technical problems, or your site will stop working. In these moments, you need web hosting support that acts immediately and possibly in real time. If the hosting can only be emailed and the response time is many hours or even days, this is a big NO for me.
Step 4 – Activate the Web Hosting Service
Most modern hosts guide you through:
- Domain connection
- SSL activation
- WordPress setup
By the end, your website space is ready. No coding required.
Here is an example of how to activate the web hosting domain using Bluehost
1. Go to www.bluehost.com (or another web host of your choice)

2. Choose your Plan
Click on “View Plans” and you will be redirected to the page where you will find the available subscriptions.
Choose the option that best suites your website needs and budget

3. Enter the Domain of Your Site
In the “I have a Domain Name” box, enter the domain of your previously purchased website (see Step 2).
Alternatively, you can use the “New Domain” box to search for a name for your site that is still available. Bluehost offers you a free domain registration.
If you don’t have a domain yet and don’t want to search for it now, you can still leave this part blank and proceed to the next step.

4. Enter Your Account Information
Complete the form with all the information required to activate your account. A payment receipt will be sent to the email address you use on this screen.

5. Check Your Subscription and Complete Purchase
You can choose the duration of the hosting service. The longer the subscription period, the lower the price will be. I usually tend to choose the two-year plan, but the decision is totally up to you.
Once the data is all correct, enter the payment information and proceed with the purchase. Remember that you have a 30-day money back guarantee. If for some reason Bluehost does not satisfy you, you can ask for a refund of what you paid, and you will not have lost anything.

Step 5 – Install WordPress
This is the stage when your website “comes to life.” Most hosts (Bluehost, A2 Hosting, WP Engine) offer one-click install.
However, here is how to install WordPress from C-Panel or manually in case your web hosting doesn’t provide the on-click installation functionality.
Install WordPress from C-Panel
Knowing how to build a website is very important, as you can see. Now, once your hosting service is active, the first thing you need to do is install WP. The operation is very simple.
- Log-in to your C-Panel account (the control panel connected to your hosting and provided to you when you activate a subscription with Bluehost, WPEngine, SiteGround or another service you have chosen).
- Look for the WordPress icon and click on it.

- In the window that appears click on the button to start the installation


- Select the version of WordPress to install (always choose the most recent) and the domain on which to install WP. In this example, you will see that I have used my domain templatetester.com.
- Click on “install” and wait a few seconds until the installation is complete.


- Now you have access to your site and you can start focusing on content and design.
Installing WordPress Manually
Installing WordPress manually is required when your chosen web hosting service does not support C-Panel.
The web hosting companies that do not have C-Panels are just few. If the service you have chosen does not provide a C-Panel, it is probably a good idea to review your choice and change providers.
However, if you stick with your choice, and want to complicate your life a bit, you can read our guide on how to install WordPress manually.
Step 6 – Create Your Website
At this point, the technical part is behind you. Your site is accessible on the internet or, in website jargon, it’s live.
Now it’s time to make yourself known to the public. Pay attention to your site’s design to ensure a pleasant and engaging visitor experience.
Start by choosing a template, or theme, for your website.
There are thousands of WordPress templates available, many of them completely free. Below is an example of a free WordPress template, which is a great option if your budget is very tight.
A free WordPress theme is an excellent place to start. You can always switch to a paid template later. Premium themes are more powerful and offer additional features that can be useful as your site grows.
Soon, I’ll share where to find the best premium WordPress templates—but for now, let’s start with the free ones.

How To Find And Install a Theme For WP
#1 Enter the WordPress Dashboard
To enter your WP dashboard, just type this address: https://YourWebsite.com/wp-admin (of course replace YourWebsite with the name of your website!)
The WordPress dashboard looks like this.

As you can see, the look is very clean and smart. The black bar on the left is where you can access all the functions to upload content, change the appearance of the site, manage features and more. The menu can be different depending on the plugins you decide to install as you go (we’ll talk about plugins in a bit).
#2 Look for a Free Template for WordPress
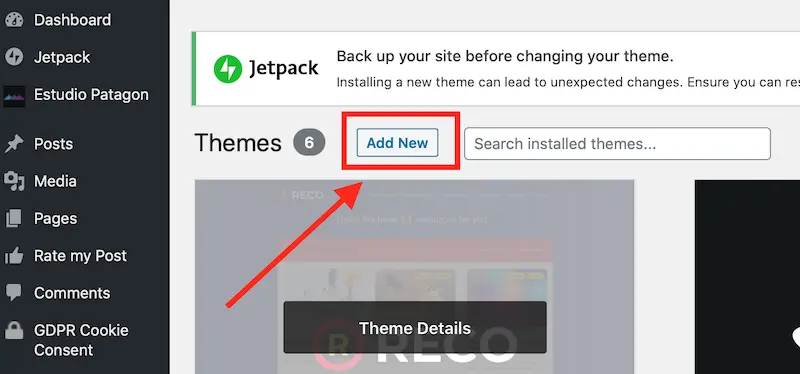
To search for the various free templates available, click Appearance>Themes.

Click on “Add New” to access the full list of free WordPress templates.
Now, you can start exploring the free WordPress themes available. You can also refine your search using the menu at the top. In particular, the “Feature Filter” menu is useful if you already have some features and functionality in mind that you need. Activating this filter will make your search much faster.

When you see a theme that gets your attention, click the “Preview” button. This function shows you a typical site built with the selected template. The preview is useful to get an idea of what you can do with the chosen WP theme. If you are happy with the result, click “Install” to upload the theme to WordPress.

Once the installation is complete, all you do is activate the theme to implement it on your site. You are now ready to start adding your own content and customizing the look of your website.
Step 7 – Add Content to Your Website
Now that your theme is installed, you’re ready to start creating your own content. In this section, I will show you how to upload pages and posts to WordPress and how to customize them.
Before I start, I want to share a few words about the difference between a post and a page on WordPress.
WordPress pages are static, meaning that the date does not show, and they are not displayed as new content in your blog. Consider pages as those parts of your site that, once uploaded, do not need frequent updates. The most classic examples of static content are the pages like:
- About Us
- Contacts
- Privacy Policy
- and so on.
Posts, on the other hand, are the content that you periodically upload and refresh. They have a date, which you can make visible or not, and, therefore, needs to be updated over time if you want them to continue to appear in search results.
In addition, they are shown in chronological order in your blog, can receive comments from users, be shared on social networks and so on. Once your site is set up, posts are the ones you will use most frequently.
Adding and Customizing a Page
In the WordPress dashboard menu click Pages>Add New.
You will see a screen with commands very similar to those of a Microsoft Word document

Here you can add text, images, or other items you want to have on your page.
Once you’re done preparing your content, click on “Preview” to see how your visitors will see the page when they visit your site. If you are satisfied with the result, click “Publish” and your page will be accessible to your visitors.

Add and Customize a WordPress Post
To create a post for your blog, go to Posts>Add New. Now, you can start creating your own article just like you would on a Microsoft Word document. Add images, bold text, links, and more to create an eye-catching article.

Once the work is complete, go to Preview to check the result. If everything is in order and you don’t need to change anything, click on “Publish” and your new post will be visible to everyone.
Unlike pages, your posts should be organized into categories. Categorize group articles that are similar or discuss the same topic. For example, some of the categories I have on TemplateTester.com are: Web Hosting, Website Builders, Seo Tools and so on.
Creating a category only takes a few seconds. On the WP dashboard go to Posts>Categories.
Assign a name to the category and a post slug (which is how the category will appear in the URL.) For example, I called my category “Website Builders” and the post slug is website-builders. Once the operation is finished, click on “Save” and your category is created.

Each post can be assigned immediately to a category while you create it (if you already have the categories setup), or you can assign it later if you still need to create the category.
In any case, the category of a post can be changed at any time. To assign a category to your post you simply click the one you want from the categories list on the right sidebar.

Images
Adding an image or media to your article or page takes just a few simple steps:
#1 Click on “Add Media”

#2 Choose the Image to Upload
Now, you have two options. You can choose an image that you have previously uploaded to your database by clicking on the “Media Library” menu. Alternatively, you can upload an image directly from your computer using the “Upload File” menu.

Once you have selected or uploaded the image, insert it into the article or page by clicking on the “Insert into post” button.

Setting the Featured Image
In addition to the images inside your post, remember to upload the “Featured Image”. This is the preview image your visitors will see when they visit your site.
To set it up, look at the right sidebar for the link “Set Featured Image” and then follow the same steps as above.

Setting the Navigation Menu
To make navigation easier for your users, you must set one or more menus for your site.
You may want to include several of the pages, or articles, you have created in your navigation menu. This is the correct procedure to follow:
Go to Appearance>Menu.
Choose the page you want to add to the menu and click “Add to Menu”.
Select which menu you want the page to be added to. Save it, and the menu is set.
Follow the same procedure to add posts, categories, a custom link, or something else to the menu.

Step 8 – Customize the Look of Your WordPress Site
Set the Home Page
If you skip this step, WordPress will feature on the homepage a list of your most recent posts. This is generally not the best option as the home page should be the starting point from which your visitors will navigate through your site.
To this end, you must set up a welcome page as your home page that you have created for this purpose.
To set a static page as a homepage go to Settings>Reading.
Check the box “A Static Page” and from the drop-down menu choose the page that you want to be displayed on the homepage. Save everything and you’re done.

Set Site Title and Tagline
The title of your website is very important to help users immediately understand the topic of your site. It is also an important indicator for search engines and, therefore, can affect your ranking.
Ideally, you should include a keyword in the title of your website that you want to rank on search engines. For example, the title of this site is “How to Create a Website.”
The tagline is a short sentence that is added immediately after the title on each page. Again, use a phrase that is both useful to your visitors and search engines.
Here’s how to set up both the title and the tagline:
Go to Settings>General. Type the title of your site and the motto in the appropriate boxes and save everything.

Set the Sidebar
In most WordPress templates you will be given the opportunity to have a sidebar. Usually this can be positioned to the right or left depending on your preferences.
One reason to use the sidebar is to facilitate navigation within the site. For example, you could include in the sidebar a search field, a list of the most popular posts, an advertising banner, or something else. All these elements are called Widgets.
To customize the appearance of the sidebar, go to Appearance>Widgets. Select the item you want to add to the sidebar, select the area of the site where you want it to appear and click on “Add Widgets”.

Step 9 – Improve Your WP Site by Adding Plugins
What is a Plugin?
Plugins are extensions that you can use to add functionalities to your WordPress site or improve its performance. There are literally thousands of them available and you can use them for an innumerable amount of functions.
With plugins, you can add popups, image galleries, contact templates, social media links, add eCommerce, monitor the site’s performance and the list could go on forever.
Adding a plugin is very easy, but you must be careful. Use only plugins that are strictly necessary because an excess of them weighs down your site and decreases its performance.
How to Install a WordPress Plugin
In learning how to build a website, the procedure for adding a plugin is important; it is as follows: go to Plugins>Add New. Search for a plugin you are interested in by using a keyword.
Once you have found the plugin click on “Install Now”.
At this point, the new plugin will be added to the list of installed plugins on your site and you are ready to start using it.

How to Build a Website from Scratch – Most Popular Plugins
Our guide on how to build a website wouldn’t be complete without a mention of the best plugins that most webmaster use to optimize their websites. Below I have prepared a list of plugins that are loved by most webmasters.
- YOAST SEO In my opinion, this is a plugin that cannot be missing on your site. Yoast SEO tells you what is necessary to improve on your site to make Google display your pages in search results. Especially if you don’t have much knowledge of SEO, you’ll find a lot of support with this must-have plugin. There are other plugins similar to Yoast SEO that work pretty well even though none of them is as popular as Yoast.
- WordFence is one of the most used plugins to protect your site. Unfortunately, hackers are always ready to strike, and if you don’t protect your data accurately, you may soon find yourself with some nasty surprises. There is a free version of this plugin that works excellently, while the premium version will give you total peace of mind.
- ContactForm. This plugin is designed to create contact with your visitors. It allows you to create modules through which your users can send you messages or communications. You can use it on your “About Us” page, or wherever you need it on your site to collect your visitors’ contacts.
- Updraft: UpdraftPlus is a widely trusted WordPress plugin that allows you to schedule automatic backups. Regularly backing up your website is essential and should never be overlooked. In the event of technical issues, a recent backup can save you from losing months of work and prevent prolonged downtime. For best results, it’s recommended to configure the plugin to run daily backups.